The Cubicon Single Plus 3D printer is one of the easiest and most user friendly 3D printers in the market. Its auto levelling feature and fully coated, heated bed provides you with the best print quality while saving you the hassle of manually adjusting your print. However, just like any other 3D printer, it is important to ensure that the machine is regularly maintained to prolong its shelf life and optimize print quality. Thus, follow this guide for some handy tips on how to maintain the Cubicon Single Plus 3D printer.
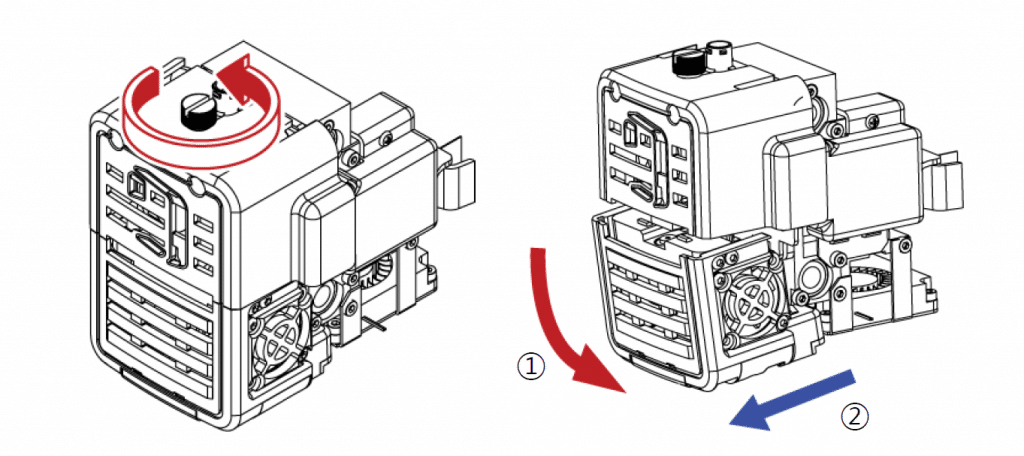
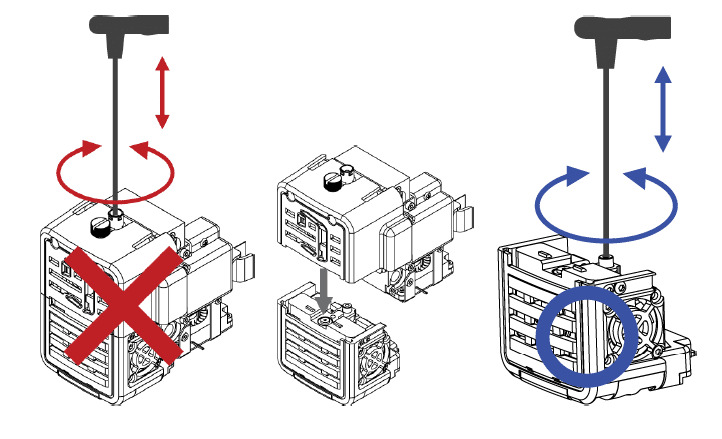
Attaching is basically the reverse order of detaching. Make sure to attach the extruder after inserting it to fixture part and tighten knob in clockwise direction. Once you feel a clicker after the hole (which is on fan of rear extruder), the extruder is engaged. Do not use force on knob as accurate combination is required. Instead, repeat attaching process again.
Points to note:
*Make sure to turn off the printer power to separate/install the detachable extruder. Proceed after extruder nozzle completely cools down.
*Be careful of possible injury if the removable extuder separation/installation is done when nozzle temperature is high.
*Make sure not to install/separate detachable extruder with extreme force as it may cause damage to the extruder.
*3D printing with improperly installed detachable extruder or improperly tightened setscrew may cause malfunction. Make sure to install the extruder properly prior to using 3D printer.
*Make sure not to touch the extruder part with wet hands to prevent shock as the extruder includes electric equipment.
The extruder nozzle is located at the bottom of the extruder. The nozzle is a key part in 3D printing as this is where filament melts and extrudes out onto the printing bed. Therefore, making sure that the extruder is in good condition is essential to maintain the Cubicon Single Plus and ensure good print quality.
It is possible for the extruder nozzle to be worn out or contain filament impurities that might have piled up inside due to continuous nozzle use. Therefore, we recommend regular nozzle replacement.
However, in the case of improper use, several issues relating to the nozzle may occur earlier than the supposed wear and tear period. This may result in poor printing quality. When print quality is constantly an issue, the nozzle cover might have been blocked, requiring nozzle replacement.
We recommend regular nozzle cleaning to maintain uniform and satisfactory printing quality.kig
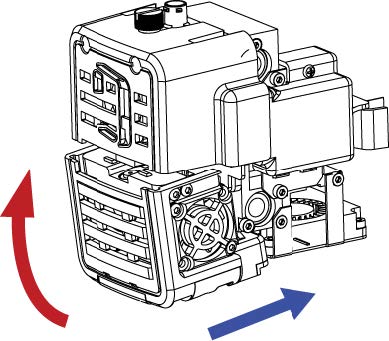
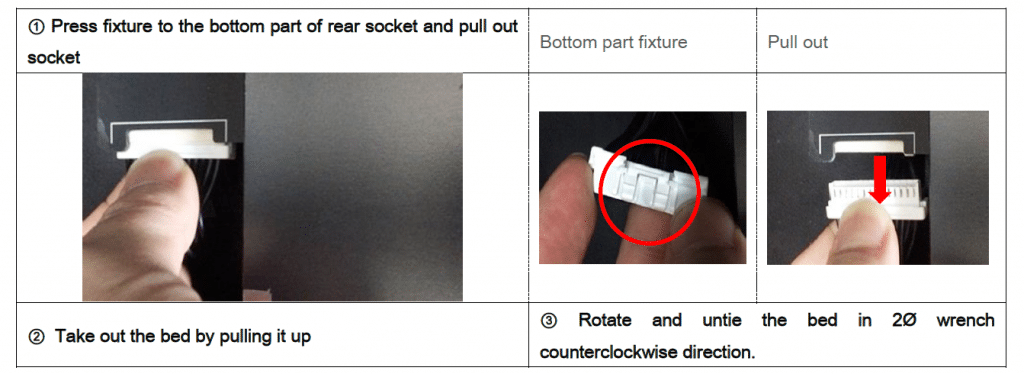
Turn off the printer power and pull out G_FAN from the extruder rear side. Be careful as damage might occur in the cable pull out process.

Turn and separate the bolt from cover front in counterclockwise direction with wrench of 2Ø diameter.
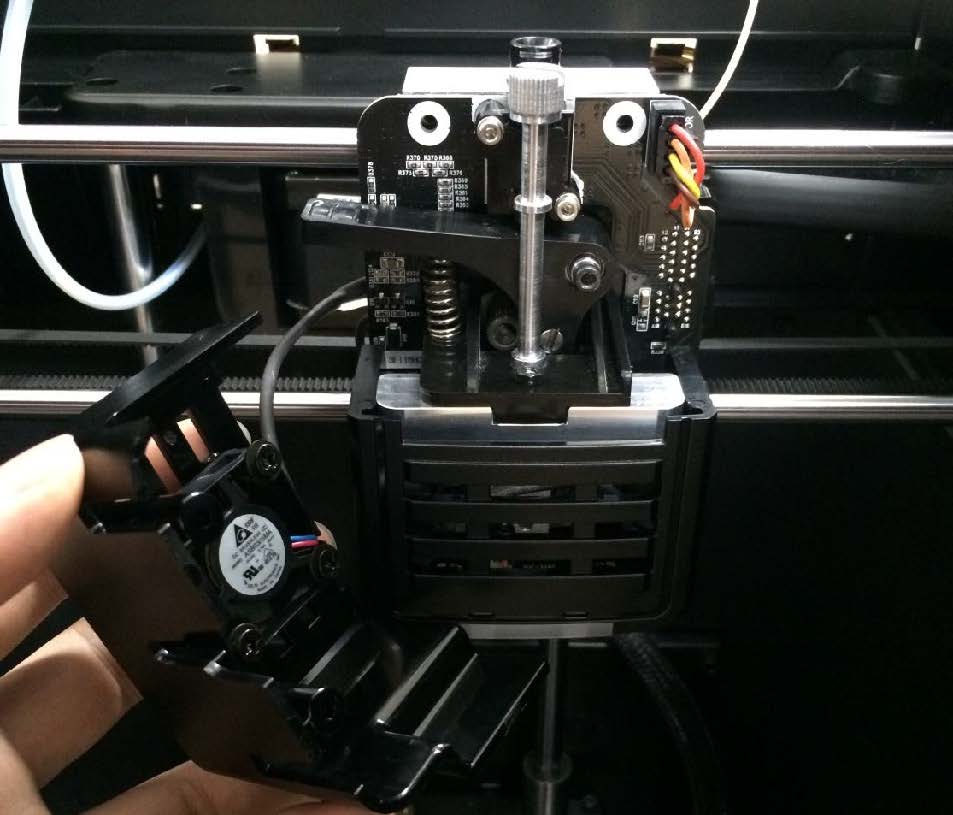
Be mindful of the gear fan which is installed to the cover and separate the cover. Then, remove all leftover filament and filament powder from the gear with the anti-static brush. Press the handle and use the antistatic brush to clean dust.

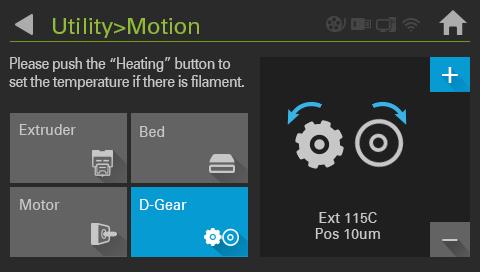
You can rotate the extruder gear with D-Gear of motion by turning the power ON in the extruder pullout condition.
Make sure to rotate the gear pressing handle. In the case of cleaning with air compressor, quality decrease and equipment malfunction may occur due to powder insert to shaft.
Points to note:
*Make sure to rotate the gear by pressing handle in the process of the gear cleaning. The gear abrasion may occur in the case of moving the gear without pressing handle.
*Be mindful that powder insert to the shaft in the air cleaning process may cause equipment malfunction.
*Do not put conductive materials into cleaning part during the printer power is ON. It may cause equipment shock.
Due to the fact that all filaments have varying properties, small bits of filament might accumulate slowly and cause extruder issues. For example, if you have previously used ABS and now wish to change to PLA, the printer will extrude ABS filament first before PLA. However, a minimal amount of PLA material may still remain on the wall surface. These leftover filaments accumulate and can cause printing failure due to nozzle blockage.
To clean filament channel, simply remove the leftover filaments using tweezers through inserting it to the filament entrance of the detachable extruder.
First, heat up the extruder to the correct temperature (ABS: 240°C, PLA: 210°C). Next, use the nozzle control pin to push the filament residue that has accumulated over time. Make sure not to push forcefully as it may cause damage to the extruder.
Points to note:
*Make sure to wear gloves to prevent accidental injury as inside of nozzle is extremely hot.
*Make sure to only hold plastic part of detachable extruder when cleaning. Metal part and rubber part of extruder are hot.
*Cleaning with nozzle control pin does not have to be done regularly if you do not mix materials.
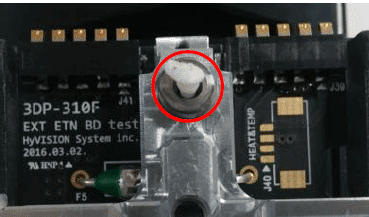
The tip of the extruder nozzle touches the interface of the heating bed and determines the electric current applying necessity. It recognizes the distance between the heating bed and nozzle and therefore adjusts heated bed automatically. Hence, when there are contaminants on the heating bed interface and nozzle tip, auto leveling will fail due to poor electric current application. Make sure to clean contaminants on heating bed to prevent auto leveling failure.
The three points indicated in red are for auto leveling interface. Auto leveling failure occurs due to presence of melted filament on these parts. Make sure to clean the interface with tweezers or scraper before printing.
The nozzle tip is directly in contact with the heated bed in the auto leveling process. This part carbonizes easily due to filament staining during the printing process. Therefore, make sure to clean it with a wire brush which is equipped to an antistatic brush.
The heating bed is where your 3D printed product is formed by melting and extruding filament. This bed gets polluted easily by filament or filament pieces which melts and attaches to prints in the formation process. When printing in such condition, contaminants stick on the formation of your print, causing pollution of the print or poor formation attachment to the heating bed in the printing process.
Make sure to maintain a tidy heating bed before and after printing to prevent poor print quality due to pollution.
Remove filament leftover of the heating bed using tweezers, scraper or a brush. Be mindful of heating bed surface damage in the process. Lamination peeling off due to surface damage causes poor printing quality due to difficulty of material adhering to bed.
You may face difficulty removing leftover filament on surface of heating bed. Make sure to remove serious pollutions by wiping with the right amount of high purity acetone.
Points to note:
*You may notice some stains on the heating bed surface. This is not a point of concern as these stains appear during the lamination process and does not affect print quality.
*The heating bed lamination usage period depends on user’s printing habit.
*The heating bed of Cubicon Single Plus is able to process printing without using kapton tapes when using Cubicon filaments. However, users can purchase and use kapton tape depending on their printing habits.
*Do not use solvents other than acetone for the heating bed as they damage lamination.
*Make sure that the acetone does not stain other objects when using for heating bed cleaning as it may cause product damage.
*Use acetone in well ventilated place and be mindful of acetone maintenance.
*Make sure to follow acetone safety regulations.
*Do not use wet tissue as abluent ingredient of some wet tissues may cause heating bed lamination pollution.
*Do not forcefully separate print from heating bed as it may cause heating bed malfunction.
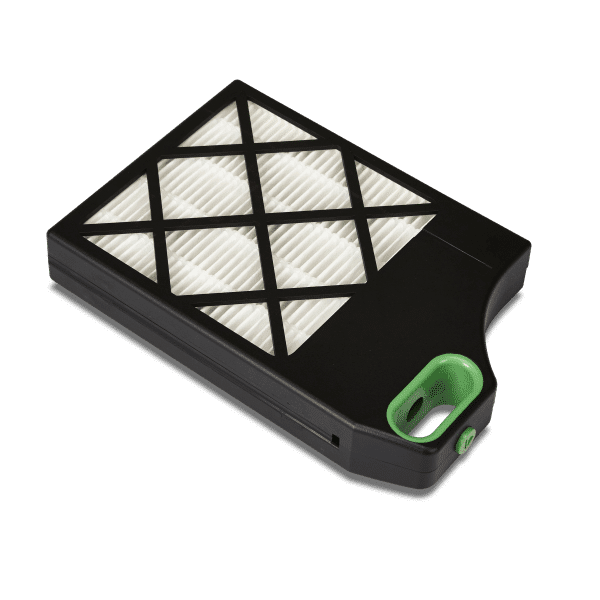
The HEPA filter consists of a triple structure of deodorizing filter for filtering out contaminants. Accumulated contaminants may interfere with filter and fan operation, leading to product malfunction.
Do not attempt to clean polluted air filter. Instead, routinely replace with a new one. Replacement period of the clean filter depends on product use environment and user’s printing habit.
Generally, we recommend replacing the HEPA filter every six months.
A heat resistant rubber cleaning brush and a wire brush are attached to the left side of the heating bed for cleaning the nozzle tip. These two brushes should be replaced when damaged.
We recommend replacing the rubber cleaning brush when the brush is unable to function properly due to leftover filament. Continuous brush use without replacement may cause auto leveling failure and nozzle shock.

Subscribe now to keep reading and get access to the full archive.
Click one of our contacts below to chat on WhatsApp
Email us for further assistance at: [email protected]