

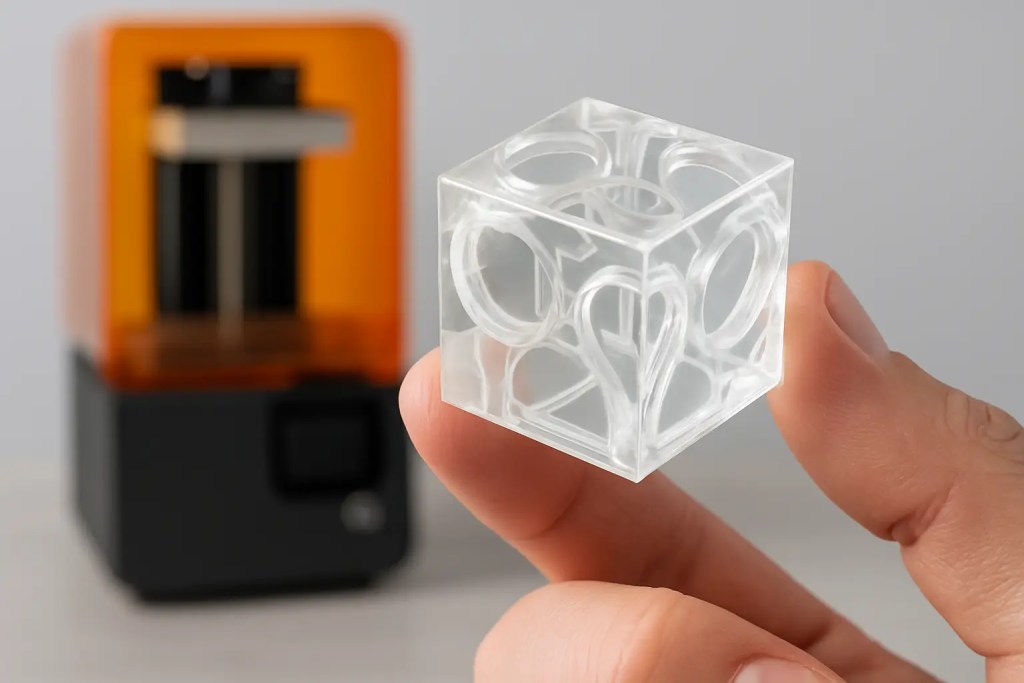
A clear SLA part rarely comes off the build platform looking like “glass.” It usually comes off looking transparent in the thick sections, hazy at edges, and visibly stepped on curves. That gap between expectation and reality is where most schedules slip – and where good process control saves time.
SLA clear resin printing is absolutely capable of producing highly transparent parts for light pipes, fluidic inspection windows, sensor covers, and visualization models. But clarity is not a single setting. It is a chain of decisions: resin selection, geometry, print orientation, support strategy, wash parameters, cure profile, and finishing method. Change one link and you change the result.
What “clear” means in SLA clear resin printing
Engineers often use “clear” as shorthand for three different performance targets: transparency (you can see through it), optical clarity (minimal distortion), and cosmetic gloss (a smooth, shiny surface). SLA can reach all three, but not always at the same time, and not without post-processing.
A freshly printed clear resin part typically has internal transparency but surface scatter. Light scatter comes from micro-texture created by layer lines, peel forces, and support contact points, plus any residual resin film if washing is under-controlled. The physics is straightforward: a surface that is optically smooth relative to the wavelength of visible light will transmit more cleanly. A surface that is microscopically rough will look milky even if the material itself is transparent.
That is why “it depends” matters. If you only need to see a liquid level inside a manifold, moderate transparency may be enough. If you are evaluating an LED lens pattern or sensor alignment, you are asking for optical performance – and that drives a stricter workflow.
When SLA clear resin is the right process (and when it is not)
SLA is a strong match when you need fine features, smooth surfaces, and watertight geometry at prototype volumes. Clear resin is commonly used for:
- Light pipes and indicator windows
- Flow visualization and inspection covers
- Prototype lenses for form/fit testing (not final optics)
- Enclosures where you want internal visibility
- Medical and lab prototypes where you need to see alignment
The trade-offs are just as important. Standard clear resins are not “glass.” Many are more brittle than engineering thermoplastics, and long-term UV exposure can yellow parts over time. If the part will see impact, snap fits, or elevated temperature, you may be better served by a different polymer process (for example SLS or HP Multi Jet Fusion for tougher nylon parts) and then design in a window separately.
For production optics, injection molded optical-grade polycarbonate or acrylic still wins on repeatability, material stability, and surface fidelity. SLA is best positioned as a rapid, high-detail path to validated geometry and assembly learning.
Designing for clarity: geometry and wall thickness
Clear resin parts punish vague drawings. Geometry choices determine how forgiving the finishing process will be.
Thickness is the first lever. Thin walls transmit light with less absorption, but they also show every surface defect because there is less depth to “average out” haze. Very thick sections can look darker or slightly tinted depending on resin chemistry and cure state. If a part needs a viewing window, keeping that window region consistent in thickness is more important than maximizing thickness for strength.
Sharp corners and abrupt thickness transitions are the next issue. They create stress concentrations and can also trap uncured resin internally. If you have enclosed cavities, add drain paths and design access for wash flow. Clear parts that look fine externally can develop internal streaking if resin is trapped and later partially cures.
Finally, specify what matters on the drawing. If a surface is an optical window, call it out as a critical surface and avoid putting supports there. If a region will be sanded and coated, give it enough stock and keep it accessible.
Orientation and supports: protecting the optical faces
In SLA, orientation is not just about minimizing supports. It is about controlling where the part will show artifacts.
Supports leave marks. Even with careful placement, contact points can produce pits or witness marks that are difficult to fully remove without changing geometry. For optical faces, the best practice is simple: keep supports off them.
Layering also matters. Surfaces angled relative to the build plane will show stepping, and stepping increases scatter. If you have a window that must be clear, orient it so the surface either prints as close to vertical as practical (reducing visible layer edges) or is positioned for the easiest finishing path. There is no universal “best” orientation – the best choice is the one that keeps critical surfaces clean and makes post-processing predictable.
Washing and curing: clarity is process control
Clear resin exaggerates any inconsistency in washing and curing. Residual resin film causes haze, sticky patches, and later clouding. Over-aggressive washing can craze some resins or soften sharp detail. Under-washing leaves surface contamination that permanently reduces clarity.
A controlled wash process focuses on time, solvent condition, and agitation. Solvent that is loaded with resin will redeposit material on the part. For clear components, that often shows up as a uniform “fog” that no amount of curing will fix.
Curing is equally sensitive. Under-curing leaves the part softer and can cause long-term tackiness or discoloration. Over-curing can increase brittleness and contribute to yellowing, especially with high UV exposure. The right cure profile depends on resin, part mass, and performance requirements. For engineering teams, the practical takeaway is that “more cure” is not automatically better – it should be a controlled, documented step.
Finishing for optical results: what actually works
If you need near-glass appearance, plan on finishing. The pathway you choose depends on geometry, tolerance sensitivity, and the acceptable labor content.
Sanding and polishing for flat or accessible surfaces
Mechanical finishing works best on broad, reachable faces: windows, flats, and gentle curves. A typical approach is progressive sanding to remove layer texture and support marks, followed by polishing to restore gloss.
The trade-off is dimensional risk. Every sanding step removes material, and it is easy to round edges or alter critical fits. If a window sits in a gasketed groove, you may need to mask sealing surfaces or design the window as a separate insert.
Clear coating for high clarity with less labor
A clear coat can dramatically improve transparency by filling micro-scratches and leveling the surface. Coating is often the fastest route to a “wet look” finish, especially on complex geometry that is hard to polish evenly.
The trade-offs are coating thickness variation and long-term durability. Coatings can chip, scratch, or change optical behavior slightly. If the part mates to tight assemblies, you need to account for the added thickness. If the part will see solvents, validate chemical compatibility.
Vapor smoothing: usually not the tool for SLA clear resins
Vapor smoothing is commonly associated with thermoplastics like ABS. For SLA photopolymers, vapor-based methods are less standard and highly resin-specific. In most industrial workflows, clarity improvements on SLA clear parts come from sanding/polishing and coating rather than vapor processes.
Tolerances and inspection: clarity can hide defects
Clear parts can be deceptive. Bubbles, delamination, micro-cracks, and trapped resin can be difficult to see until you change lighting or angle. If the part is functional – for example a fluidic cover – inspect under directional light and verify sealing faces before finishing. Once coated, rework becomes harder.
Dimensional inspection should happen before heavy finishing steps. If you polish after you discover a fit issue, you have less material left to correct it. For critical assemblies, it is often faster to validate fit, then finish only the optical surfaces, rather than finishing the entire part cosmetically.
Common failure modes (and how to prevent them)
Haze is the headline complaint, but it has multiple root causes. If the haze is uniform, suspect wash solvent condition or residual resin film. If the haze is localized near supports, it is usually mechanical damage or incomplete removal of support witness marks. If the haze appears after curing, suspect over-cure, heat, or resin aging.
Yellowing is typically a resin chemistry and UV history problem. Some clear resins will amber over time, especially under sunlight. If long-term appearance matters, consider storage conditions, UV exposure, and whether a UV-stable coating is required.
Cracking or crazing often points to stress plus environment – sharp corners, high cure energy, or exposure to incompatible chemicals. If you are making a clear press-fit cover, redesign the interface with proper lead-ins and fillets, and validate the assembly force.
How to specify a clear SLA part to a service bureau
The fastest projects are the ones with unambiguous requirements. For clear resin parts, define the intent by surface.
Call out which faces must be transparent versus merely “clear.” Identify optical windows, sealing faces, and cosmetic zones. Share the use case: light transmission, visual inspection, fluid contact, or display-only. If the part must withstand heat, UV, or mechanical load, say so upfront – resin choice and cure strategy change.
If you are ordering multiple iterations, keep the process stable between builds. Clarity is sensitive to small workflow changes, so consistency matters more than squeezing a marginally faster turnaround.
For teams that want an industrial workflow with documented controls and repeatable output, an ISO 9001:2015-certified partner can reduce variation across builds and across programs. If you need that kind of process traceability alongside fast quoting and global fulfillment, Additive3D Asia typically supports clear SLA work as part of broader prototype-to-production programs.
A practical way to think about “clear” before you print
Before you commit to SLA clear resin printing, decide what success looks like in one sentence: “I need to see the alignment marks through this cover,” or “I need a glossy, display-quality housing where you can see internal components.” That single sentence drives orientation, support placement, finishing, and inspection.
The best clear parts are not the ones that were printed perfectly – they are the ones that were designed, processed, and finished with intent, so clarity is a controlled outcome rather than a hopeful surprise.