

How to Dye Nylon 3D Printed Parts
If your nylon part came off the machine looking technically correct but commercially unfinished, color is usually the next decision. For engineers and product teams working with SLS or MJF nylon, dyeing is often the fastest way to move from a raw white or gray print to a part that looks production-ready without changing geometry, tooling, or base material.
That said, dyeing nylon 3D printed parts is not just a cosmetic step. It affects appearance, perceived quality, part identification, and in some cases how consistently a product line can be released across multiple builds. The result depends on the nylon grade, the print process, part geometry, porosity, and how tightly the post-processing workflow is controlled.
Why nylon is a good candidate for dyeing
Nylon is one of the most dye-friendly materials used in additive manufacturing because it is naturally porous enough to absorb color. This is especially true for powder bed fusion parts such as PA12 and PA11 produced through SLS or HP Multi Jet Fusion. Instead of coating only the outer surface, dye can penetrate into the material to a limited depth, which generally gives a more durable finish than paint alone.
For functional parts, that matters. Dyed nylon typically handles light abrasion and handling better than a thin surface coating because minor scuffs are less visually obvious. It also preserves the part’s dimensions more effectively than thicker paint systems, which can be relevant for snap fits, housings, jigs, and mating features.
The trade-off is that dyeing does not behave like injection molded color matching. Additive parts have layer-based microtexture, variable wall thickness, and some level of porosity. Those characteristics influence how deeply the dye penetrates and how uniform the final shade appears.
Which 3D printed nylon parts dye best
Not every printed polymer is equally suitable for dyeing. In practice, the best candidates are unfilled nylon materials with a relatively open surface structure.
PA12 and PA11
PA12 is the most common choice for dyed functional parts because it balances strength, dimensional stability, and predictable post-processing behavior. PA11 also dyes well and can be attractive when higher ductility is required. Both are commonly used for enclosures, brackets, clips, medical device housings, consumer hardware, and short-run end-use components.
SLS and MJF parts
SLS nylon and MJF nylon are the usual starting point for dyeing. Surface texture differs slightly between the two processes, and that can influence the final color. MJF parts often start from a gray base and may present darker color outcomes, while SLS parts often provide more flexibility for brighter shades if the starting material is lighter.
Materials that may not respond the same way
Glass-filled nylon, highly polished sealed parts, and some non-nylon polymers may show weaker absorption or inconsistent color. SLA resins and FDM filaments generally require different finishing methods, often painting or coating rather than true dye penetration. If color consistency is critical, material and process selection should be made before the first build rather than treated as an afterthought.
The process for dyeing nylon 3D printed parts
For industrial applications, dyeing works best as a controlled finishing step, not a bench-top experiment. The basic sequence is straightforward, but repeatability depends on discipline at each stage.
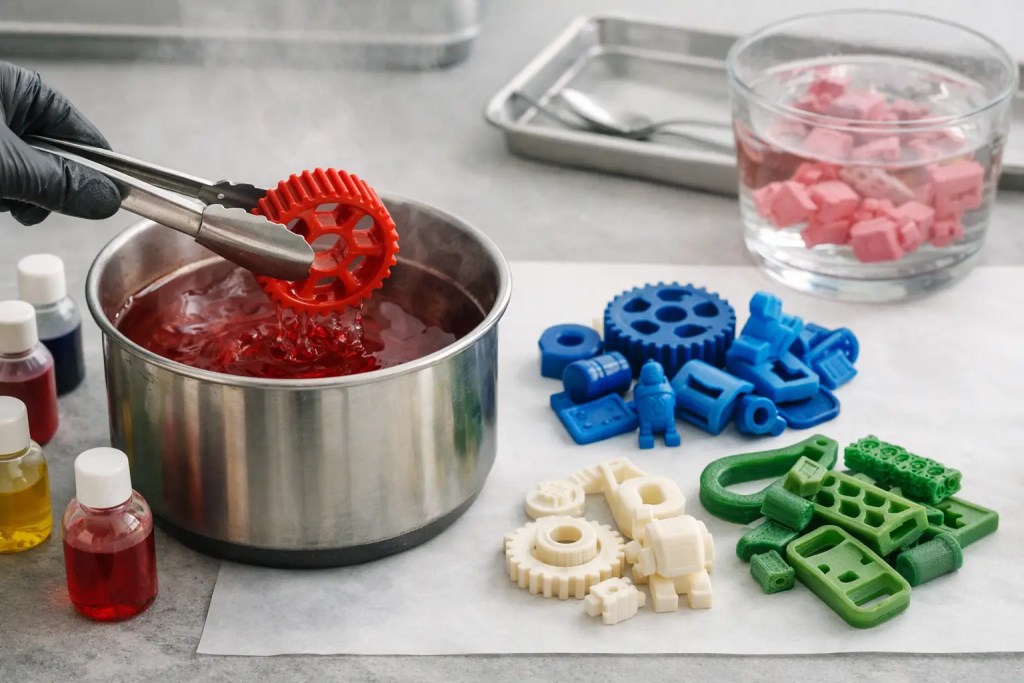
1. Start with a clean, fully depowdered part
Residual powder, oils from handling, and surface contamination will interfere with absorption. Parts should be fully depowdered and cleaned before entering the dye bath. If a part has trapped powder in internal channels or lattice features, those areas may end up visibly lighter after dyeing.
Cleaning also affects shade consistency across batches. Two parts printed in the same material can dye differently if one retains more powder residue or has a rougher post-blast condition.
2. Control the surface condition
The as-printed texture has a direct effect on color. Rougher surfaces generally appear darker because they scatter light differently and expose more surface area to the dye. Smoothed or sealed surfaces may absorb less dye and present a slightly different tone.
This is where engineering intent matters. If the goal is a uniform production appearance, surface finishing should be standardized before color is applied. If the goal is simply to distinguish prototype variants, a wider visual tolerance may be acceptable.
3. Use the correct dye chemistry and temperature
Nylon responds best to dyes formulated for polyamide materials. Temperature, concentration, and immersion time all influence the result. Higher temperature can improve penetration, but if the process is not controlled carefully, color variation between runs becomes more likely.
Dark colors such as black generally produce the most consistent outcome and are widely used for end-use nylon parts. Bright colors are possible, but they are more sensitive to the starting material color, wall thickness, and any process variation in cleaning and finishing.
4. Rinse, dry, and inspect
After dyeing, parts need to be rinsed and dried thoroughly. Inspection should cover not only color but also dimensional integrity, warping, staining in recessed areas, and consistency across critical surfaces. For customer-facing parts, it is worth checking visual uniformity under the intended lighting environment rather than only under shop lighting.
What affects color consistency most
When teams run into problems with dyeing nylon 3D printed parts, the issue is usually not the dye itself. It is variation somewhere upstream.
Part geometry is one factor. Thin walls, thick sections, and enclosed features do not always absorb dye at the same rate. The same applies to orientation and local packing effects in a build. Even when dimensions are within spec, the visible finish may differ slightly between parts with very different mass distribution.
Build-to-build consistency matters too. Powder refresh ratio, machine settings, and thermal history can influence porosity and surface behavior. In an ISO-controlled environment, these variables are managed more tightly, which reduces finishing variability later.
Color target also matters. Black is usually the most forgiving. Mid-tone grays, blues, and reds can look excellent, but they require tighter process control. Very light colors can be difficult to achieve uniformly on darker base materials.
When dyeing is the right finish, and when it is not
Dyeing is an efficient finishing method when you need color without adding significant thickness. It is especially useful for functional prototypes, low-volume production parts, housings, handles, clips, brackets, and wearable components where the printed texture is acceptable or even desirable.
It is less suitable when exact brand color matching is mandatory, when the part requires a glossy cosmetic surface, or when the base material and process produce too much variation for the visual standard expected. In those cases, painting, vapor smoothing with secondary coating, or a different manufacturing route may be the better decision.
There is also a durability question. Dyed nylon generally performs well for handling and light wear, but it is not the same as molded-in color for every application. If the part will face heavy UV exposure, aggressive chemicals, or repeated abrasion, finishing should be validated against the end-use environment.
Design considerations before you commit to dyed nylon
If color is part of the product requirement, design for finishing early. Large flat cosmetic faces will reveal variation more readily than textured or broken-up geometry. Deep recesses, internal channels, embossed text, and very dense lattices can all complicate cleaning and dye access.
Tolerance planning matters as well. Dyeing typically adds far less thickness than paint, but any additional finishing sequence can still affect fit if the part already sits at the edge of tolerance. This is particularly relevant for hinges, threaded inserts, sliding interfaces, and sealing features.
For production programs, it is also worth defining what acceptable color variation looks like. Many teams specify dimensions tightly but leave appearance open to interpretation, which creates avoidable rework later.
Moving from prototype color to repeatable production
The hardest part is usually not getting one good-looking sample. It is reproducing that sample over multiple builds and reorder cycles. That requires the material, print process, depowdering method, surface prep, dye parameters, and inspection criteria to be aligned.
This is where a manufacturing partner with both additive capability and controlled post-processing becomes more valuable than a print-only supplier. If the same team manages production from build setup through finishing, there are fewer uncontrolled handoffs and fewer variables affecting the result. For teams ordering functional nylon components at scale, that reduces risk in both procurement and quality.
At Additive3D Asia, that kind of workflow control matters because dyed parts are rarely evaluated on color alone. They are judged on whether they arrive on time, match prior builds, and perform as intended in assembly or field use.
Color should support the part, not introduce uncertainty. If you are specifying dyeing nylon 3D printed parts for a real product, treat it as an engineered finishing process with defined material, surface, and inspection standards. That is usually the difference between a part that merely looks better and one that is ready to ship.