How To Assemble 3D Printed Parts With Threaded Fasteners
Threaded Fasteners for 3D Printing
Threaded fasteners are a popular and effective way to assemble 3D printed parts into one piece. When building prototypes for hardware products, you often need to make assembled structures that are more complicated than a single 3D printed component. For example, an electronics enclosure or robotic assembly. Therefore in such cases, threaded fasteners are a great tool for efficient assembly and disassembly.
Methods and Processes
There are mainly five different methods used to assemble 3D printed parts with threaded fasteners, the most conventional one being cutting a thread.
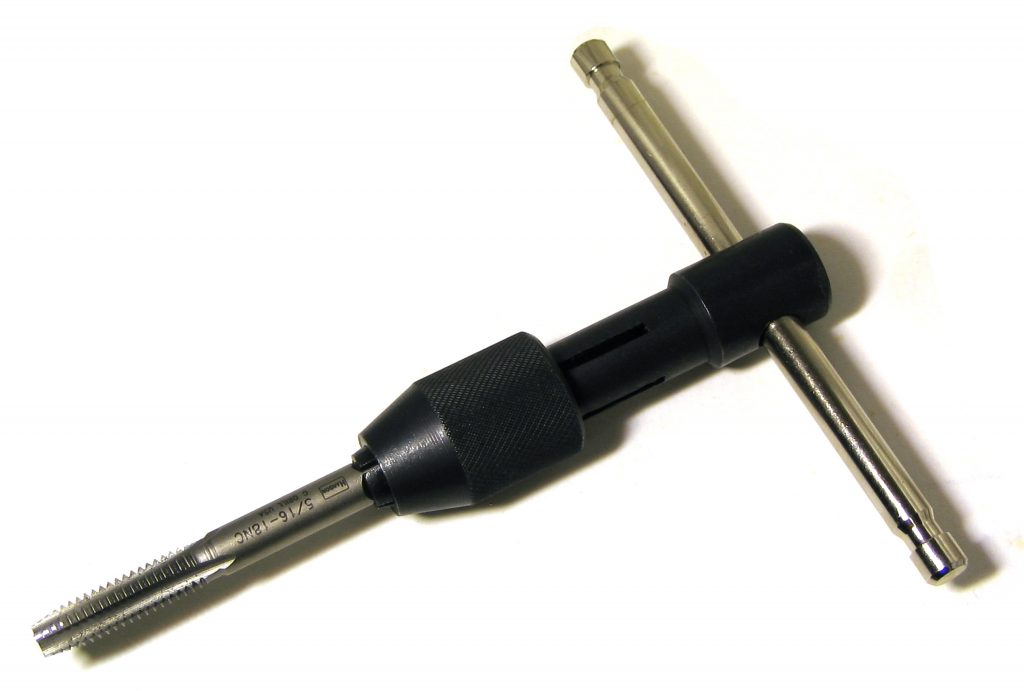
1. Cutting Threads
This is the most traditional method for using threads. In traditional manufacturing, once a CNC places holes where threads will go, a drill tap is used to create the desired threads in each hole.
When assembling 3D printed parts, you can use the same method with a hand drill tap to create threads in your plastic prototype. It involves using a tap wrench to cut a thread in a pre-printed or drilled hole.
3D print or drill a hole in the required location of the thread.
Using the correct size tap wrench and ensuring it remains perpendicular to the hole, slowly cut the thread regularly reversing or “backing off” to remove excess material to avoid binding.
Avoid forcing the tap wrench as this can lead to fractures or splitting of the 3D printed material.
Continue tapping to the desired depth.
Insert your desired threaded fastener before assembly to ensure a clean fit.
2. Self-Tapping Screws
Securing 3D printed parts with self-tapping screws is the cheapest and fastest method. Self-tapping screws bore their own opening simultaneously during the process of being screwed into materials.
This method is ideal for your first prototype. However, note that using self-tapping screws also mean limitations for disassembly. Hence, it is not suitable for parts that need to be assembled and disassembled frequently. It is also brittle and thus may break easily.
3D print or drill a hole in the desired screw location. For optimal pilot hole size consult the self tapping screw provider. A pilot hole size that provides 75% to 80% thread engagement is a good starting point if this information is difficult to come by.
Assemble components to be secured ensuring to correctly align all holes where the self tapping screws will be used.
Slowly screw self tapping screw down into hole ensuring it remains perpendicular to the hole during fastening.
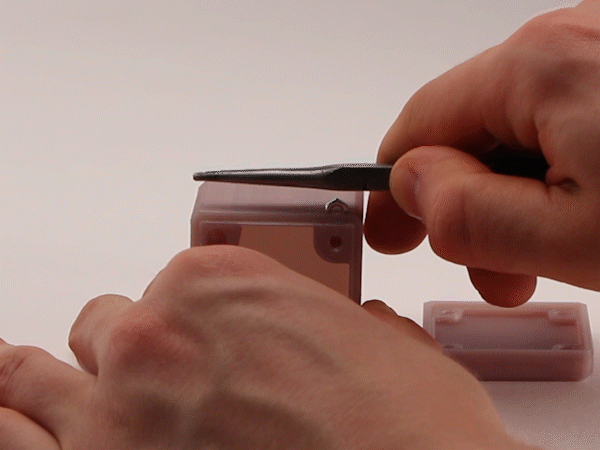
3. Threaded Inserts
Threaded inserts is the most common go-to method to assemble 3D printed parts with threaded fasteners. This is due to the fact that this method is straightforward, easy and clean.
There are two types of inserts – heat set inserts and tap-in inserts.
Heat Set Inserts
Align the insert with the pre-printed or drilled hole (for hole sizes refer to the insert manufacturer’s recommendations)
Insert a soldering iron into the insert heating it and the surrounding material up (avoid overheating and melting the surrounding material)
Slowly apply pressure, pushing the insert down into the hole to the desired depth.
Tap-In Inserts
Align the insert with the pre-printed or drilled hole (for hole sizes refer to the insert manufacturer’s recommendations).
Using a hammer gently tap the insert down into the hole to the desired depth.
4. Embedded Nut
Another method to secure two separate 3D printed parts is to slide a nut into the component via a nut shaped cavity.
Measure your nut. If you do not have access to the nut a quick internet search will reveal standard overall dimensions for both metric and imperial nuts.
Include the desired nut profile in your CAD model. An iterative process may be required to find the best nut clearance based upon printer calibration. As a starting point a 0.2 mm offset around the nut (0.1 mm each side) should give a loose fit. This also may need to be increased for nuts greater than M12.
Select the appropriate cut out depth (typically just below flush).
Including a drop of superglue on the back side of the nut will help secure it in place.
5. Printing Threads
3D printing threads allows you to save time and effort on post processing. The highly customizable method also enables you to design a thread that perfectly fits your needs.
However, this method requires more expertise. It is more challenging as you need to measure the specification for your screw and design that thread into your part.
Threads can be created with Fusion360. Find instructions here.